
Tools of the trade
Canning stops the natural spoilage of produce to preserve its flavour and keep it safe. Sounds complicated and perhaps slightly dicey, right? Not at all, as long as you’re equipped with the right technique and the proper gear.
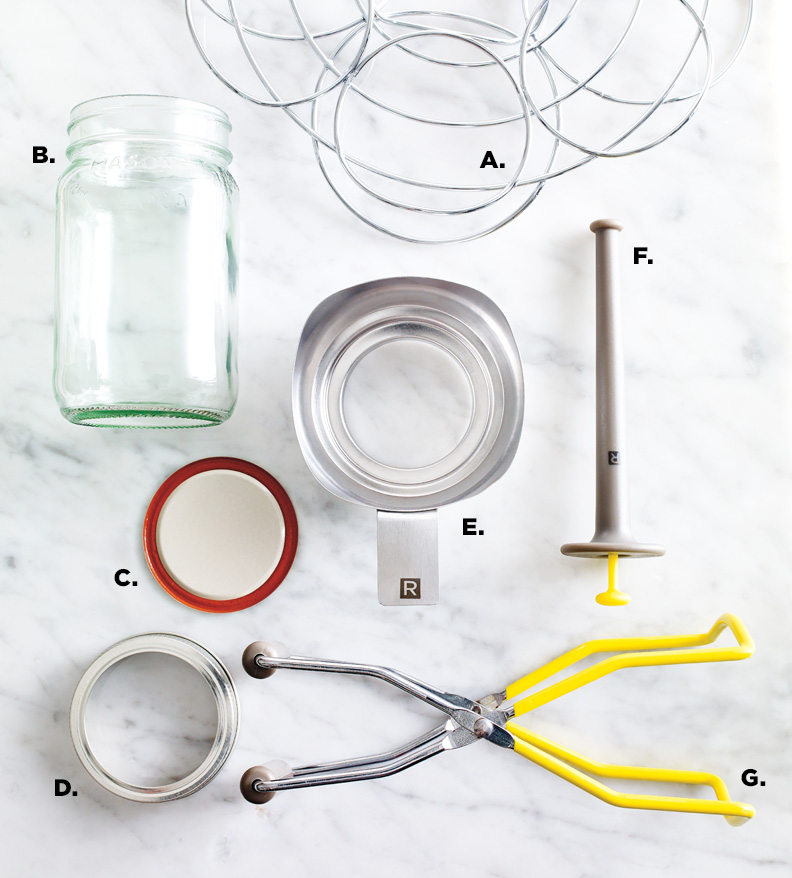
A. RACK
A separate canning rack such as this one allows you to turn any large, deep pot into a canner. It keeps the jars upright and prevents them from rattling on the bottom of the pot.
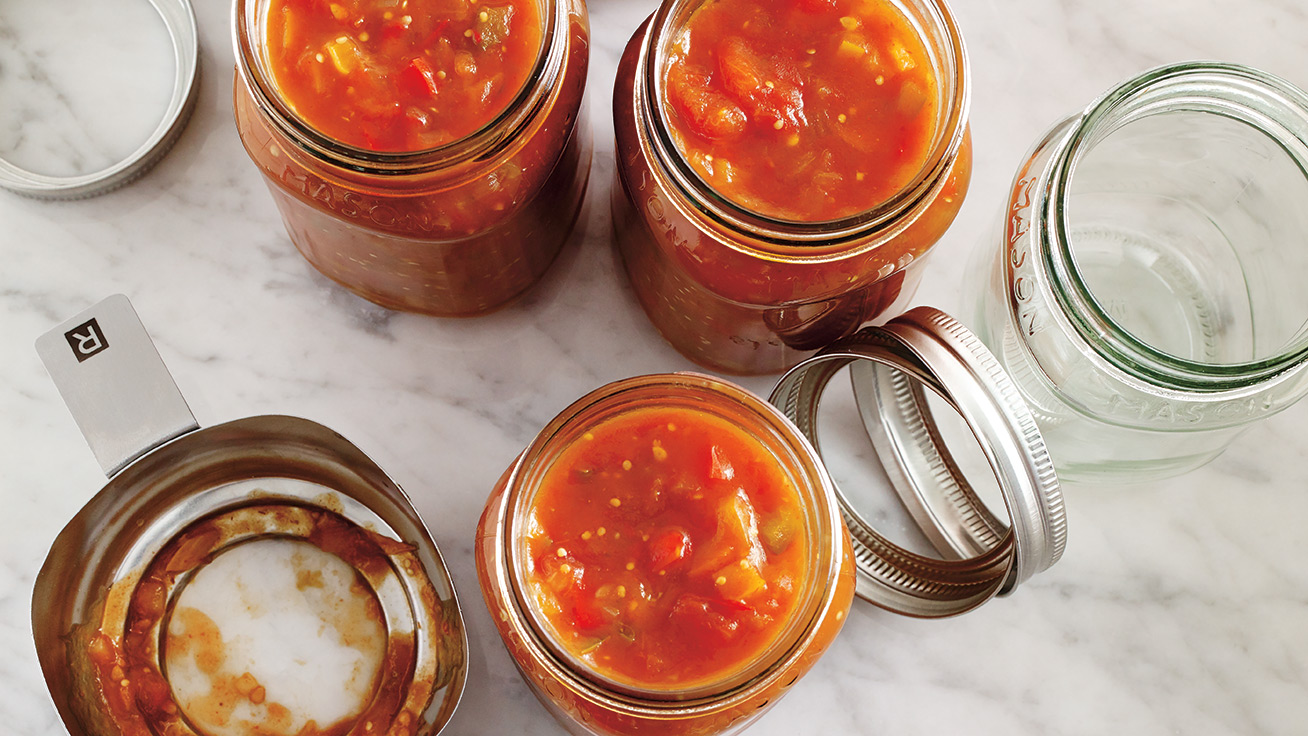
B. GLASS JARS
It’s important to only use jars made specifically for canning, which are available in a number of sizes (typically 125 ml, 250 ml, 500 ml and 1 litre). And as long as they aren’t cracked or chipped, they are reusable.
C. LIDS
The flat, disc-like lid (as opposed to the metal ring) is what creates a perfect vacuum seal. During the heat treatment, the red sealing compound softens and adheres to the rim of the jar, leaving an imprint. This is why canning lids are good for only a single heat-processing and are not reusable.
D. RINGS
Think of these as a vise-grip, used to help hold the lid in place during the heat-processing. Once the jar has cooled, the ring (also called a screw band) can be removed and, if desired, reused.
E. FUNNEL
To make sure your recipe makes it cleanly into the jar (and off the counter!) during the filling process, choose a funnel with a wide opening that fits snugly into the mouth of the jar.
F. LID LIFTER
You’ll love this gadget. It is used to lift the flat metal lids out of the hot water. Sure beats trying to pick them up with your tongs.
online store
2-in-1 Lid Lifter And Bubble Popper
G. JAR LIFTER
To safely remove jars from a pot of boiling water or pressure canner, this tong-like tool is a lifesaver. Your fingers will thank you!
online store
Jar Lifter
Hitting the mark
How long your produce needs to be heat-processed to destroy dangerous micro-organisms depends on two things: the nature of the recipe (acidity level, density, etc.) and the size of the jar. Sterilization, whether in a pressure canner or in a boiling-water bath, typically takes from 10 minutes to over an hour. Calculating the proper processing time is critical and requires expertise in food chemistry. We like reliable recipe guides like those by Bernardin (the makers of the Mason jar).
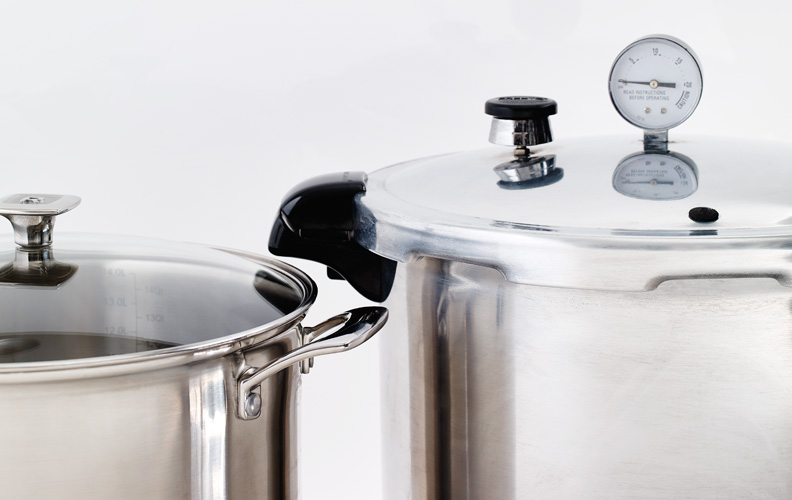
BOILING-WATER CANNER
Canning pots are high and wide enough to hold several jars at a time and come equipped with a canning rack. They are what you need for naturally acidic foods like tomatoes, or recipes containing vinegar, lemon juice or lime juice, like salsa, pickles and some fruit preserves. They will run you between $35 and $180, approximately, and are a good investment if you plan on canning often. They come in various sizes, from 11½ quarts to 23 quarts and counting.
PRESSURE CANNER
This tool is specially designed to safely can low-acid foods—anything from vegetables, meat and stew to spaghetti sauce and broth. The pressure raises the boiling point of water to 240°F (116°C), which is critical: This temperature destroys spores that cause botulism (check out our canning FAQ for more information). Pressure canners are about $130 to $250, but aren’t to be confused with pressure cookers—some pressure cookers can be used for both cooking and canning, but that’s not always the case.
Warning: The pressure cooker (Presto type) that is used for cooking is not suitable for the sterilization of canned goods because it can't reach and maintain the right pressure. Some models are suitable for cooking and sterilization, but that is not always the case. Check the device’s user manual to be sure, and follow the instructions included for canning to the letter.
HIGH-ACID
- • Lemon & Lime: pH: 2
- • Grapefruit, Rhubarb & Vinegar: pH: 3
- • Blueberry, Strawberry, Raspberry, Orange & Apple: pH: 3.5
- • Cherry, Blackberry, Peach & Pear: pH: 4
CUT-OFF BETWEEN LOW- AND HIGH-ACID FOODS
- • Tomato (4.2 to 4.9): pH: 4.6
LOW-ACID
- • Beet, Carrot, Pumpkin, Cucumber & Bean: pH: 5
- • Beef, Celery & Cauliflower: pH: 5.5
- • Lamb, Squash, Spinach, Pea, Potato & Veal: pH: 6
- • Asparagus, Pork, Chicken & Rice: pH: 6.5
- • Crab, Corn & Fish: pH: 7
Step-by-step
The basic procedure is the same whether you’re canning meat or jam. The only thing that changes is the heat-processing method used once the jars are filled and closed: High-acid foods are canned in boiling water while low-acid foods get the pressure-canner treatment. Either way, this all-important final heat-processing step ensures that your canned food is safe.
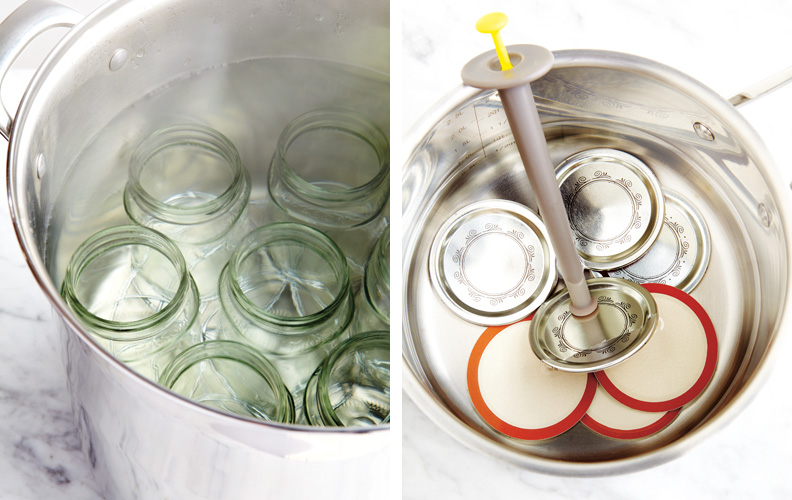
1. CLEANING AND PREHEATING THE JARS
Start with clean, hot jars. There’s no point in sterilizing them prior to filling as the final heat-processing step after they’ve been filled and sealed sterilizes both the food and the jar at the same time. Jars can also be washed and kept warm in the dishwasher until you’re ready to fill them.
Carefully inspect each jar. Avoid ones that are cracked or have rims that aren’t perfectly intact (this will prevent the lid from sealing in an airtight manner).
Wash the jars in warm, soapy water and rinse thoroughly. Then, stand them upright in the pot that you’ll be using for canning. Fill the jars and the pot with hot water. Heat on the stovetop over medium heat until simmering. Turn the heat off and keep the jars in the hot water until you’re ready to fill them. (Note: Filling a cold jar with hot food or liquid could cause it to shatter, a phenomenon called thermal shock. This is why jars need to be hot when filled.)
2. PREPARING LIDS
Remember to only use brand-new lids. The metal rings, however, can be reused. Place the lids in a small pot filled with water. Bring to a boil, then turn off the heat to allow the sealing compound to soften. Do not boil the lids as the sealing compound can become too soft and lose its effectiveness.
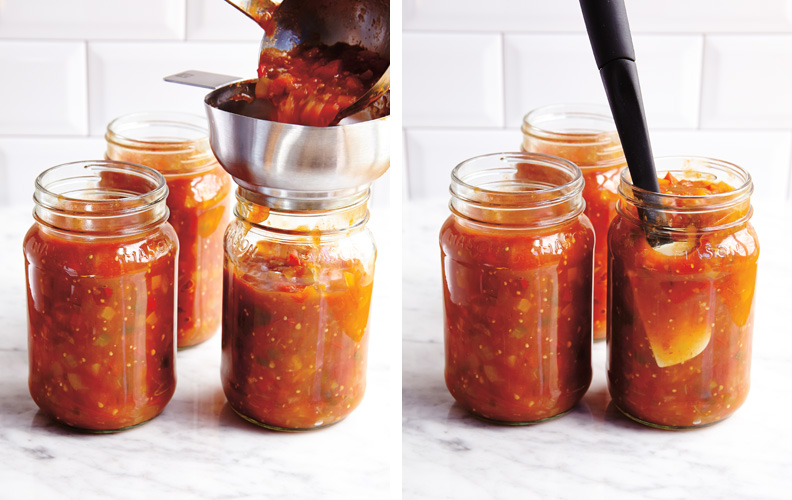
3. FILLING
Ladle your warm, prepared recipe into the hot jars, taking care to leave sufficient headspace (the empty space between the rim of the jar and the food). This space is needed for the expansion of food during the heat-processing and to allow a proper vacuum to form after cooling. It should be measured with a ruler. The required headspaces are generally as follows (but always respect the specifics of the recipe):
- Jam, jelly, spread: ¼” (0.5 cm)
- Whole or sliced fruit: ½” (1 cm)
- Tomatoes: ½” (1 cm)
- Salsa, chutney, ketchup, pickles: ½” (1 cm)
- Low-acid foods, pressure-treated: 1” (2.5 cm)
SPECIAL FEATURE
10 Recipes for Making Preserves
4. RELEASING AIR BUBBLES
To release air bubbles that can be trapped inside the jar under the food, slide a wooden, plastic or rubber tool along the inside of the jar. Steer clear of metal utensils, such as a knife, that can scratch and damage the glass. Once you’ve released any trapped air bubbles, readjust the headspace (if required).
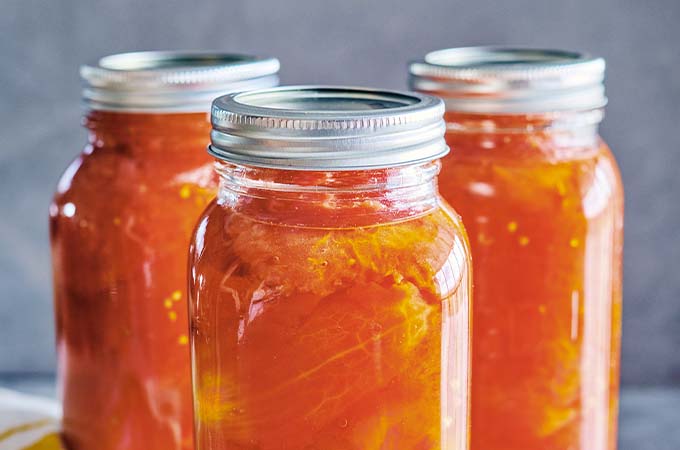
5. SEALING
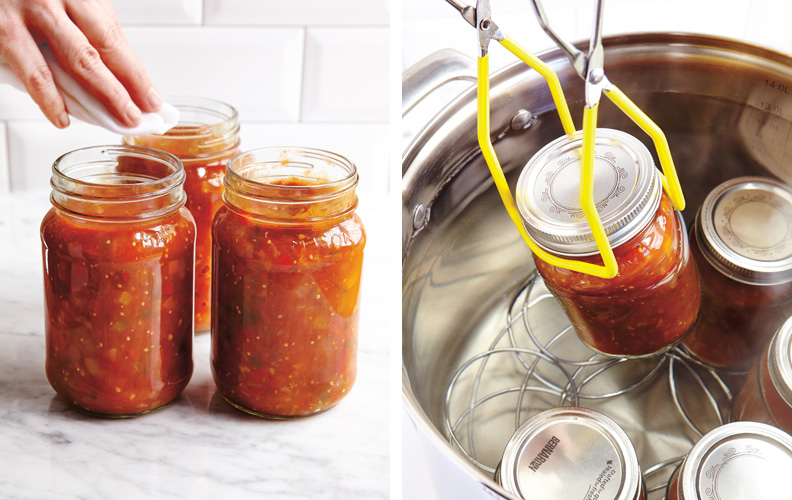
As you go, make sure to wipe the rims of the jars with a clean, damp cloth. Any residue could prevent the lid from sealing properly.
Place a flat lid over the opening of your jar and screw on a metal ring. Tighten the ring only to the point of resistance, then tighten an additional eighth-turn or so. If the ring is not tightened enough, the contents of the jar could seep out during processing. If it is too tight, the air left in the headspace won’t be able to escape from the jar, which is critical when creating a vacuum seal.
6. HEAT-PROCESSING
Depending on the acidity of the recipe, the procedure will be different.
Boiling-water bath, appropriate for: Naturally acidic foods (pH lower than 4.6) or recipes that have added vinegar, lemon juice or lime juice.
Stand the jars up in the canning rack in the same pot used to warm them. Add water as required: The jars should be covered by at least 1 inch (2.5 cm). Cover with a lid and bring to a boil over high heat. Begin timing when the water is at a rolling boil. Maintain the boil for the entire processing time specified in the recipe.
Pressure canner, appropriate for: Low-acid foods (pH > 4.6) or recipes that have no added vinegar, lemon juice or lime juice. Stand the jars up in the pressure canner rack. Adjust the water to the level recommended by the manufacturer.
Lock the lid and heat the unit over medium-high heat until steam starts to escape from the vent port. Allow the steam to escape for 10 minutes before closing the vent according to the instructions.
Continue to heat over medium-high heat until the pressure reaches 10 lb (69 kPa), which is the pressure required to attain a temperature of 240°F (116°C). Start timing the process once the canner has reached the right pressure. Adjust the burner heat to maintain the pressure throughout the processing. While some pressure canners require constant supervision, others can be left more or less unattended.
When the required processing time has elapsed, turn off the heat, leave the canner undisturbed and allow the pressure to fall on its own before unlocking the lid, a process that can take up to an hour.
NOTE: 10 lb (69 kPa) is the pressure required if you live less than 300 metres (1,000 feet) above sea level. At higher altitudes, the required pressure is 15 lb (103 kPa), but the processing times remain the same.
7. COOLING
Remove the jars from the pot or pressure canner and stand them up on a counter lined with two dishtowels (this will prevent a thermal shock between the hot jars and a cold surface).
Don’t tighten the rings, even if they’ve become loose. Moving them at this stage could dislodge the lid and break the vacuum seal as the sealing compound is still soft.
Let cool for 24 hours. You’ll hear a pop every time a jar becomes sealed (the popping sound occurs when a lid is pulled downward by the change in pressure as the jar cools).
Check that every jar is well sealed. The lid should be curved downward and not spring up or down when pressed in the middle. Not sure? Unscrew the metal ring and lift the jar by holding onto the edge of the lid. If it’s well sealed, it won’t budge.
8. STORAGE
Ideally, keep your jars in a cool, dry place, where they can be stored safely as long as they are intact and properly sealed. Expect changes in colour, texture and flavour as the product ages, so it is best to consume it within a year.